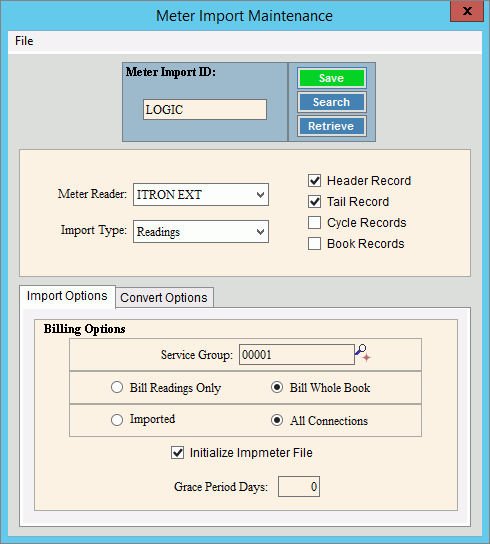
Meter Import Maintenance
Use Meter Import Maintenance to maintain information about the Meter Import file used by the Import Readings/Create Transactions routine of the Meter Communications. Information maintained includes the meter reader device type, header record indicator, and tail record indicator. You can specify the service codes for which to create billing transactions. The bill readings or bill whole book options allow you to generate billing transactions only for readings or to include all accounts in a given book even if there are no meter readings, as in the case of flat rate customers. The imported or all connections option allows you to generate billing transactions for a single service connection (meter) for each account or to generate billing transactions for all service connections associated with the account including their meters, meter trailers, components and location Reference Type services. For example, if a customer has a meter and components such as outdoor sprinklers, then selecting all connections will create transactions for the other types of service connections as well as the meters.
Notes:
NDS Support will assist you with setting up this information. Once this information is set, it does not change unless you change your process.
For more information about electronic meter reading, see Meter Communications.
To open:
Click Daily Work from the Menu, next click File Maintenance; click Import Maintenance, and then click Meter Import Maintenance.
Or, use the keyboard shortcut: [ALT] [y] [m] [i] [m].
Meter Import Maintenance Example:

Meter Import Maintenance Prompts |
|
To create
a meter import or to view one, enter the unique ID and click Retrieve Required Notes:
|
|
|
To update the new or changed information, click Save or press [ENTER] if the button is in focus. Keyboard shortcut: [ALT + s] |
To avoid losing data, you must save new or changed records. |
|
Meter Reader |
To select the type of meter reading device used for reading meters, click a choice in the drop-down list. |
To specify the type of import, click a choice in the drop-down list. |
|
Header Record |
To include a header record if required by the meter reading device, select the box. |
Tail Record |
To include a tail record if required by the meter reading device, select the box. |
Cycle Records |
To include cycle records if required by the meter reading device, select the box. |
Book Records |
To include book records if required by the meter reading device, select the box. |
Enter a valid service group ID, to specify the services to be billed and to include in the meter import file, if applicable. (up to 5 characters) Notes:
|
|
Billing Options |
|
Bill Readings Only Bill Whole Book |
Entry Options: To only include customers with readings, select Bill Readings Only. Or, to include all customers in a given book even if a customer does not have a meter reading, as in the case of flat rate customers, select Bill Whole Book. |
Imported All Connections |
Entry Options: To only bill the readings for the accounts, select Imported. Or, to bill all service connections associated with an account (meters, trailers, components and location Reference Type services), select All Connections. |
Initialize Impmeter File |
To initialize the meter import file at the start of the Import Readings/Create Transactions routine, check this box. Note: NDS recommends that you select this option. |
Enter the number of grace period days, which is the number of billing days before the customer is responsible for the total usage imported, as in the case of a new customer. (3.0 numeric) |
|
Convert Options Tab
|
|
Zero Readings |
To specify how to handle zero reads select one of the following, if applicable,:
|
Auto Roll Over Readings |
To automatically calculate roll-over readings, check this box. Otherwise, leave unchecked. This setting will for any detected roll overs (a reading that is less than the previous reading), calculate the rolled over usage by assuming the maximum reading is 99999 (based on the number of digits the previous reading was). Example: If the new reading is 100 and the old reading is 200 the max reading is assumed to be 999 and the usage would be calculated with this formula: Roll-over Usage Formula: Current Read + Max Read + 1 - Previous Read, then times the usage multiplier and any other factors. 100 + 999 + 1 - 200 = 900 Note: If the reading is 0 it would only do this if the meter import was set to by pass zero readings as well. |
Generate the same system estimate for the same meter |
Check this box if the same estimates for each connection should be generated when it's a single meter with multiple connections. This means using the same estimate for each of the meter's connections. For example, if you have a water/sewer meter, a water estimate would be used for the sewer estimate. |
Editing |
1. Enter the meter
import ID and click Retrieve
2. Click the field to change and enter the data changes. 3. To complete the edit
process, click Save
|
Deleting |
1. Enter the meter
Import ID and click Retrieve
2. Click File
from the Menu,
and next click Delete. 3. At the Delete prompt,
click Proceed to delete
the record, or click Cancel
to escape from the delete routine. |