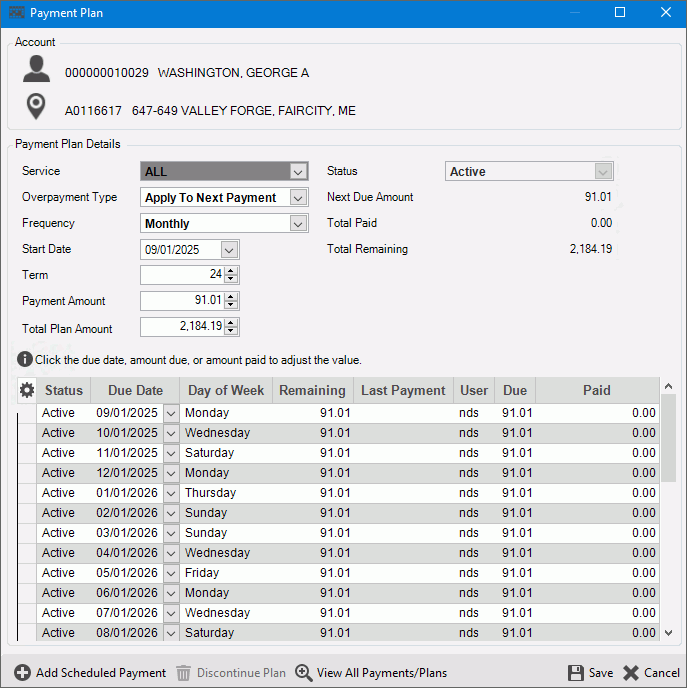
Use the Create Customer Payment Plan Wizard to create payment plans
for customers who have agreed to pay an outstanding dollar amount. When
a customer accepts a payment plan, the customer agrees to pay a specified
dollar amount according to a predetermined schedule to pay off their outstanding
amount. Using this wizard, you can specify the plan details for
a service or for all services that a customer has outstanding dollar amounts.
After a payment plan is created, you can use this screen to track
the progress a customer is making with their plan.
EDIFICE payment plans integrate with the past due and shut off routines,
making it an easy option to stop sending notices to customers who are
paying according to the agreement. In addition, customers on a payment
plan can be excluded from the Finance
Charge Calculation routines if desired.
Create Payment Plan Prompts
|
Customer
Location |
The
customer and location currently displayed in the inquiry displays
in the Create Payment Plan wizard. |
Service |
Select
a service or choose All
services. If you select all services, the outstanding balances
from all the customer's services will be included in the payment
plan. |
|
To
specify how an overpayment should be handled, click a choice in
the drop-down list.
Apply to Next Payment -
When the customer pays more than the agreed amount the customer's
next plan payment $ will be less the overpayment amount from
this time. Apply to Balance Only
- This requires the customer to honor the agreed upon plan
payment $ amount next time regardless of any prior overpayment. |
|
To
specify the intervals that the customer will make payments, click
a choice in the drop-down list. |
|
Enter
the date the customer will start making payments for their payment
plan. (mmddccyy - slashes and
century optional) |
|
The
term and payment amount fields work together to determine the
payment plan. The customer's payment plan can be calculated
based on their and the
entered or you can enter a payment plan
amount manually and the term will be calculated for you.
To select the number of payments as
the terms for the payment plan, use the up and down arrows or
enter the term. You can change the term to see how it changes
the monthly payment. |
|
A
calculated payment amount displays based on the term and the total
plan amount to be paid.
Or, you can enter an agreed upon payment
amount and the number of payments as the term to cover the total
dollar amount of the payment plan is calculated for you. (12.2
numeric) |
|
The
customer's outstanding balance displays as the total plan amount,
but can be changed. (12.2 numeric) |

|
To
quickly add a scheduled payment to the plan as you are building
it, click Add Scheduled Payment. |
Status |
When
creating a payment plan for the customer, the status is set to
Active. |
Plan
Statistics |
As
plan information is entered, the following information is updated:
Next
Due Amount - the dollar amount of the next payment
that is due Total
Paid - the accumulated dollar amount of payments made
on the plan so far Total Remaining -
the total remaining dollar amount due for the payment plan |
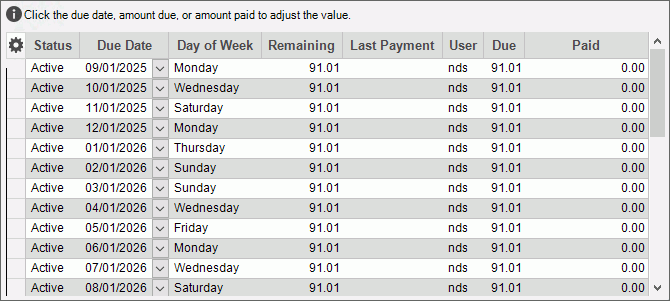
Plan
Details Pane
After
the plan term, frequency and start date are entered, the plan
details display in the Details pane. Details include the plan
status, due date for each payment, amount due, amount paid on
the due amount, remaining balance, last payment date, and the
user who created the plan. You can edit the due date, amount
due and amount paid fields if needed.

|


|
To
save the payment plan information, click Save.
The wizard window closes when the save is complete. Keyboard
shortcut: [ALT + s]
Or, to cancel the information
that was entered, click Cancel. |

|
To
discontinue the displayed payment plan, click Discontinue.
Discontinued plans can be displayed in the Payments
view if the Only show active
Plans option is
not checked. |

|
To
open the Payments view where all payments and payment plan history
for the customer can be viewed, click All
Payments/Plans. |

|
To
close the wizard without validating or saving the data, click
Close. |
 .
. .
.


