EDIFICE Inquiry - Service Management View
Use the Service Management View as a central dashboard for managing the work orders in your system. From this view you can see work order details, as well as create, schedule, re-schedule and complete work orders. Work order actions, mobile work order automation events and time related to work done for work orders or projects can also be managed here. It is important to note that this view is not specific to an individual customer or location.
Work orders display in a list, where they can conveniently be sorted by date, location, status, technician or other field. Double-click a work order to open Work Order Entry so that you can view the details or edit the work order. Print a single work order or a group of work orders. You can also print a list of selected work orders.
Note: To view work orders for a specific location or customer, use the EDIFICE Inquiry - Work Orders View.
From the EDIFICE Inquiry, click Tools and then click Service Management.
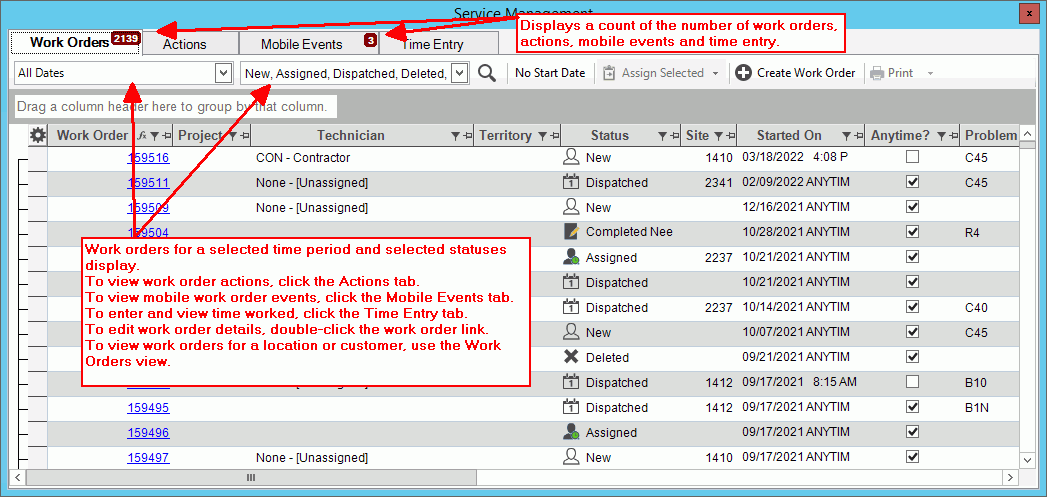
EDIFICE Inquiry - Service Management View Example:

To see directions for...
Viewing & Managing Work Orders, click More.
Below are instructions on viewing work orders, scheduling, re-scheduling, completing and printing work order.
EDIFICE Inquiry - Service Management View Prompts |
|
Viewing Work OrdersA
count of the total number of work orders in the system
displays: There are several ways to limit and organize the work orders to display. You can:
Note: To view work orders with no scheduled date, click No Start Date. |
|
Date Range
|
The view defaults to work orders for today. To limit the work orders list to ones with a start date within a specified time period:
After selecting the date range, click Search. |
Ordering/Sorting |
To organize the work orders in a certain order, click the desired column. Click a second time to reverse the order. For example, to list work orders in date order or technician order, click the date or technician column. |
Grouping |
To organize items by a specific column heading such as technician or territory, drag the column heading to the box above the grid. For example, to group the work orders by status, click on Status column heading and drag to the grouping box above the columns. Grouping Box:
|
Filtering |
To
only display the work orders that meet certain criteria,
click Filter Problem Code Filter Example:
To select the choices to use as criteria, click to check the desired box and then, click Ok. Note: Advanced filtering options are available by clicking Text Filters. |
Work Order Status |
To specify the work orders to display based on their status, click to check the desired boxes. Multiple or all statuses can be selected.
|
|
To display only the work orders that do not have a start date assigned, click No Start Date. Generally, these are work orders that need attention. The work orders without an assigned start date display. |
Edit a Work Order |
To view details or edit a work order, double-click the work order. The Work Order Entry screen opens for editing. |
Printing Work OrdersNote: There are 2 types of printing functions available:
|
|
|
To print a single selected work order or a group of selected work orders, click print and then select Print or Print View. Work orders for the selected items print. Note: The work order form is required and is generally set up during installation. For assistance, contact NDS support at support@ndsys.com. |
Completing a Work Order1. Double-click the work order to open it in Work Order Entry. For detailed instructions on entering fields, see Work Order Entry. 2. Change the status to Completed or Completed Needs Review, Completed in Field, Completed with Errors. 3. The completed date and time are automatically assigned, but can be edited as needed. 4. Enter a result code and results notes. 5.
To complete the process, click Save 6.
To automatically generate miscellaneous receivables
transactions associated with the work order, click Create Receivable Notes:
|
|
Rescheduling a Work OrderFollow these steps to reschedule a work order. 1. Double-click the work order to open it in Work Order Entry. For detailed instructions on entering fields, see Work Order Entry. 2. Change the Start Date by clicking the date picker and selecting a date or, simply entering a date. 3. Change the Start Time by clicking a time slot from the drop-down list of available time slots or entering the time. 4.
To complete the process, click Save Notes:
|
|
Assign SelectedAssign selected can be used to quickly assign a tech and a work date to a selected batch of work orders. For example, you can use this to assign a group of work orders with anytime appointments to a technician for a selected date. |
|
|
To assign a date, a technician and a problem code to a selected work order or a group of selected work orders, click to highlight the desired work orders and then, click Assign Selected. |
The following window displays:
|
|
To specify the technician, select a defined technician from the drop-down list. |
|
To select the problem code, choose a code from the drop-down list. |
|
Schedule Date |
Enter the date or select a date from the date picker. |
To assign a status to the work orders, click a status in the drop-down list. |
|
Office Notes |
|
|
To complete the change, click Ok. |
Service Management View Right-click FunctionsTo see additional options, right-click. Below is an example.
|
|
|
To expand all rows in the grid, click Expand All. To collapse all rows in the grid, click Collapse All. |
|
To copy the information highlighted in the selected rows, click Copy. |
Printing & Exporting FunctionsThese functions can be handy for further manipulating or formatting the data or sending copies to coworkers. In addition, Print and Print Preview functions are available.
|
|
|
|
To begin printing a report of the work orders highlighted in the grid, click Print. Tip: The generated list is similar to the Service Call report. To print a report of the selected work orders to the Print Preview window, click Print Preview. |
|
To
create a Microsoft Excel spreadsheet from the selected
items, click Save
as Excel. Then, follow the normal Windows®
save procedure. To create a PDF document from the selected items, click Save as PDF. Then, follow the normal Windows® save procedure. To create a Microsoft Word document from the selected items, click Save as Word. Then, follow the normal Windows® save procedure. Tip: This can be handy if you want to change the heading or print the report on letterhead. |
Window Save As |
The Windows Save As steps:
|
Viewing & Managing Time Entry, click More.
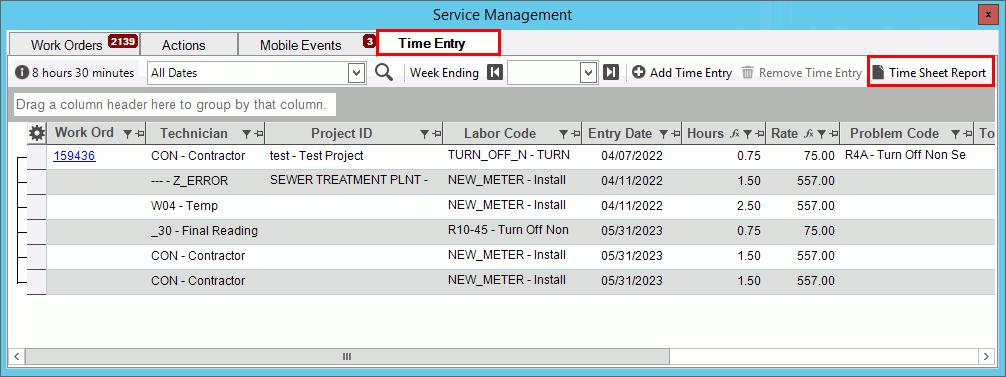
The Time Entry tab allows you to view employee time for work done, providing an overall view and analysis of work that has been done. Time entries can be added, changed and removed here. If you use mobile work orders, time that is entered in the field automatically updates here and can be edited. A time sheet option will generate a pre-formatted weekly time sheet with a signature line for the technician and a totals page. Each technician is listed on a separate page and is broken down by labor code with office and results notes, work order number if applicable, problem code and time entered for each day of the week.
From the Service Management view, click Time Entry tab. The following screen displays.

EDIFICE Inquiry - Service Management View Time Entry Prompts |
|
Viewing Time EntriesThere are several ways to limit and organize the time entries. Each are explained below. You can:
|
|
Date Range
|
The view defaults to all time entries. To limit the list of time entries to ones with a date within a specified time period:
After selecting the date option, click Search to find the desired time entries. |
Ordering/Sorting |
To organize the time entries in a certain order, simply click the desired column. Click a second time to reverse the order. For example, to list entries in entry date order or technician order, click the entry date or technician column. |
Grouping |
To organize items by a specific column heading such as technician or project, drag the column heading to the box above the grid. For example, to see all the entries grouped the technician, click the technician column heading and drag to the grouping box above the columns. Grouping Box:
|
Filtering |
To
only display the work orders that meet certain criteria,
click Filter Labor Code Filter Example:
To select the choices to use as criteria, click to check the desired box and then, click Ok. Note: Advanced filtering options are available by clicking Text Filters. |
Time Entry FunctionsThe following functions are available:
|
|
Time Entry Right-click FunctionsTo see additional options, right-click within the grid. Below is an example.
|
|
|
To expand all rows in the grid, click Expand All. To collapse all rows in the grid, click Collapse All. |
|
To copy the information highlighted in the selected rows, click Copy. |
Printing & Exporting FunctionsThese functions can be handy for further manipulating or formatting the data or sending copies to coworkers. In addition, Print and Print Preview functions are available.
|
|
|
|
To begin printing a report of the time entries highlighted in the grid, click Print. To print a report of the selected work orders to the Print Preview window, click Print Preview. |
|
To
create a Microsoft Excel spreadsheet from the selected
items, click Save as Excel.
Then, follow the normal Windows® save procedure. To create a PDF document from the selected items, click Save as PDF. Then, follow the normal Windows® save procedure. To create a Microsoft Word document from the selected items, click Save as Word. Then, follow the normal Windows® save procedure. Tip: This can be handy if you want to change the heading or print the report on letterhead. |
Window Save As |
The Windows Save As steps:
|
Viewing & Managing Actions, click More.
Viewing & Managing Automation Events, click More.