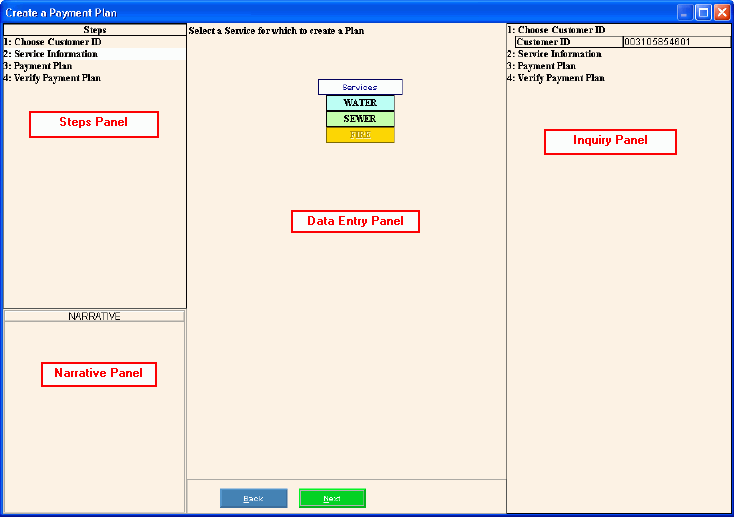
Customer Create Payment Plan Wizard
Use the Create Customer Payment Plan Wizard to create payment plans
for customers who have agreed to repay an outstanding dollar amount. When
a customer accepts a payment plan, the customer agrees to pay a specified
dollar amount according to a predetermined schedule to pay off their outstanding
amount. Using this wizard, you can set up payment plans for customers
and specify the plan details. After a customer payment plan is created,
you can track the progress a customer is making with their plan. In
addition, EDIFICE payment plans integrate with the past due and shut off
routines, making it an easy option to stop sending notices to customers
who are paying according to the agreement.
EDIFICE
can calculate the customer's payment plan based on their and the plan
or you can enter the payment plan amounts manually.
Payment
plan amounts are informational only. The payment plan amounts
do not update the customer's AR balances, and they do not print on
statements.
Use
the Payment
Plan Report to list customers with payment plans.
Do
not confuse customer payment plans with customer
budgets. They are separate routines and have separate functions.
For
general information about using wizards, see the Wizard
- Introduction.
Directions:
To see directions for...
Opening the Customer Create Payment
Plan Wizard, click More.
Creating a New Customer Payment
Plan, click More.
Editing an Existing Customer Payment
Plan, click More.
Deleting an Existing Customer Payment
Plan, click More.
Understanding
the field values for the following panels, click the panel name in
the table below:
Field Details by Panel |
Steps Panel |
The
upper left panel lists each step that you can maintain. Each
step corresponds to a specific group of fields displayed in the
Data Entry Panel. |
Narrative
Panel |
The
lower left panel provides tips and notes for entering the data. |
Data Entry
Panel |
The
center panel displays the fields for you to maintain and contains
different fields for each step.
Tip:
The step currently displayed in the Data Entry Panel is
highlighted in the Steps Panel.
Steps:
|
Inquiry Panel |
The
right panel displays the data you have entered so far for each
step. |

