|
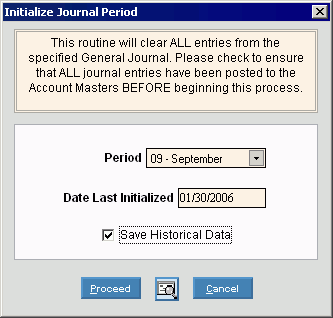
The Initialize Journal Period routine removes all
journal entry transactions for the specified period. Make
certain that a hard copy has been printed and saved for audit purposes.
|
Initialize Journal Period - Single Period
Use the Initialize Journal Period - Single Period routine to clear all transactions for a specific period and optionally copy them to history. A confirmation report prints when you are done. You can use this routine when preparing to enter transactions for a new Fiscal Year, especially if you have not yet closed the previous year and therefore do not want to initialize all periods at once.
|
The Initialize Journal Period routine removes all
journal entry transactions for the specified period. Make
certain that a hard copy has been printed and saved for audit purposes.
|
For additional information, click More.
Tips:
The initialize routine does not save, update, or roll Period Balances. It simply clears a Period so it is ready for journal entries for the new fiscal year and optionally saves the existing journal entry transactions. To save Period Balances, see the Save Historical Data routine.
You must initialize a Period before starting to enter journal entry transactions for the new fiscal year.
In preparation for the New Year, you can initialize the first three or so Periods. If it takes more than three months to close the previous fiscal year, you can initialize additional Periods as required.
This routine is similar to the Initialize Journal Periods - Year-End. However this routine only initializes a single period, whereas the Year-End routine can initialize a string of periods.
NDS strong recommends that you run the following programs for the Period to be initialized before initializing the period:
General Journal Exception Report (make corrections before running the post).
General Journal Listing for all unposted journal entry transactions.
Post Journal Entries for the period you want to initialize.
General Journal Report (for archive).
The report is available in the following formats:
80-Column Format: Set during System Parameters at the Print tab.
132-Column Format: Set during System Parameters at the Print tab.
Directions:
To see directions for...
Opening the Initialize Journal Period routine, click More.
Basic Method (from the G/L Module):
Click File Maintenance from the Menu Bar.
Click
Initialize Journal Period.
Tip: Or,
use the keyboard shortcut:
[ALT]
[m] [i].
Advanced Method (from another NDS Module):
Click General Ledger from the Menu Bar.
Click File Maintenance.
Click
Initialize Journal Period.
Tip: Or,
use the keyboard shortcut: [ALT]
[g] [m] [i].
Note: To
activate the General
Ledger menu in another module, the G/L
Application Control must be set up for the module during installation.
Initialize Journal Period Window Example:

Choosing the selections at the prompt window, click More.
|
Initialize Journal Period - Single Period Prompt Options Tip: To see more information about a field, click the hyperlink for the field name. | |
|
To specify the Period you want to initialize, click the Period in the drop-down list. (predefined format) Tip: If the journal period has been cleared previously, the routine picks up where it left off. | |
|
Displays the date of the last time this Period was initialized. (mmddccyy) Tip: If the date of the previous initialization seems incorrect, stop and research the issue. If you must recover data, you may need to restore files. Contact NDS Technical Support for assistance. | |
|
Save Historical Data |
To specify if you want to save the journal entry transactions to history: |
|
|
To run the initialize routine and begin printing to the Windows® default printer, click Print, or press [ENTER]. Keyboard shortcut: [ALT + p] |
|
|
To run the initialize routine and print to the Print View screen, click here. |
|
|
To escape from the initialize routine, click Cancel. Keyboard shortcut: [ALT + c] |
|
|
To close without performing the initialize routine, click Close. |
Report Sample(s), click More.