 on the toolbar.
Payroll Processing
Use Payroll Processing to run all the functions for processing employee paychecks and updating the payroll information. This includes entering, editing, and deleting information for generating paychecks for employees during the current Payroll Run. You can enter the employees' hours and modify standard information,like scheduled deductions. Payroll's automated features streamline the data entry, yet provide the flexibility to handle a variety of types of paychecks including regular (paper), direct deposit, manual, and prepaid checks. If necessary, you can make changes to permanent pay information that was loaded by the Permanent Pay Transfer process for this run.
Notes:
For information on entering special checks, see the Advanced Features topic.
Certain functions are optional and if you do not use them, you will not see on the Payroll Processing toolbar. For more information, contact NDS Support at 800-649-7754.
Directions:
To open Payroll Processing, click Payroll
Processing on the toolbar.
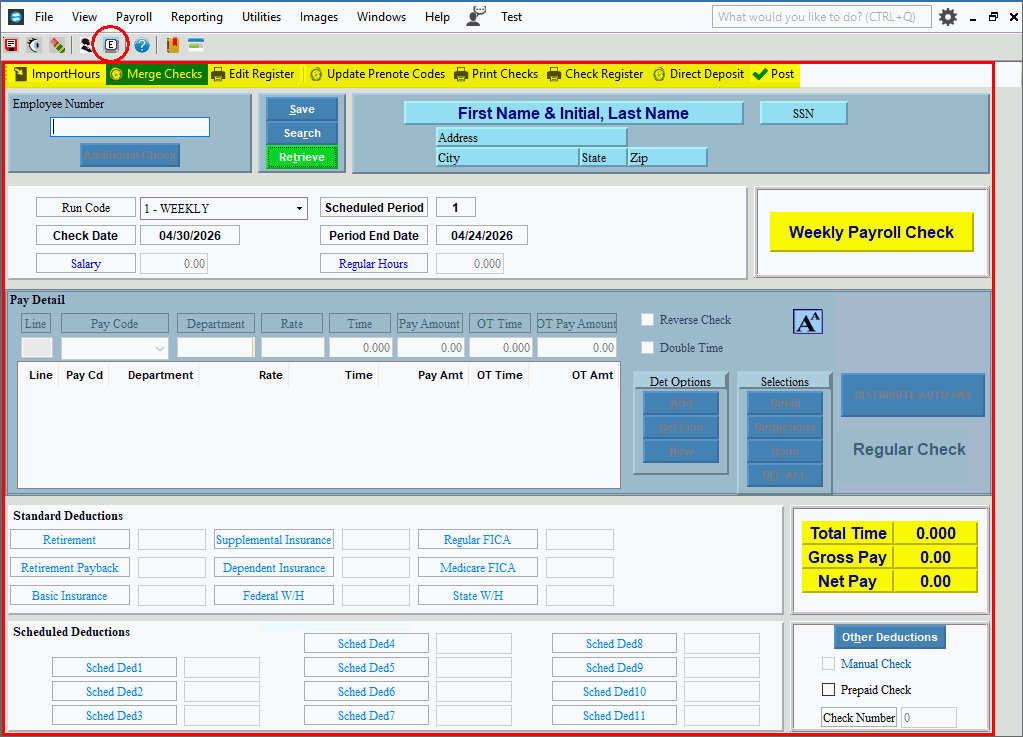
Payroll Processing Window Example:
Payroll Processing Prompts The following Payroll functions need to be run, in the same order each time to complete a Payroll cycle. Below are directions for each step. Payroll Processing Steps1. Select the Run Code and enter Payroll Run Dates. 2. Transfer Permanent Payroll, if applicable. 3. Import Hours to bring in employee hours from an outside source, if applicable. 4. Enter and edit employee paychecks using Check Entry. 5. Merge employee paychecks, if applicable. 6. Run Payroll Edit Register to review employee checks and deductions information. 7. Update Prenote Codes if using the direct deposit feature. 8. Generate Payroll checks. 9. Generate Payroll Check Register and review all check information. 10. Process and export the direct deposit file. 11. Post Payroll checks. 12. Process Fringes and A/P checks to pay employee withholding amounts and employer fringes and taxes. |
|
Use Permanent Pay Transfer to transfer paycheck information that was entered during Permanent Payroll Check Entry (the source files) into the Payroll Check Entry files for the current pay period (the target files). Please skip this step if you do not use Permanent Pay Transfer. |
|
Payroll Run Information |
First select the Run Codes, which are used to group employees together for processing the payroll cycle and reporting. Next if this is the first time you are processing payroll for the selected Run Code, enter the information at the Edit Payroll Check Dates screen. If this is the first time using Payroll Processing for this Payroll Run and you use the Direct Deposit feature, enter the date at the Direct Deposit Transmission Date prompt. |
Use the Import Hours feature to quickly import employee payroll hours to Payroll and generate paychecks for the employees. This optional time-saving routine is a 2-step process where the information is first imported and displayed on the screen. You will review the employee hours that will be imported and resolve missing information errors. The second step is to run the update, which will use the import hours information to generate employee paychecks and update the paychecks into Payroll. For directions, click Import Hours. |
|
If
you want to consolidate multiple checks for an employee into a
single check select Merge Checks
|
|
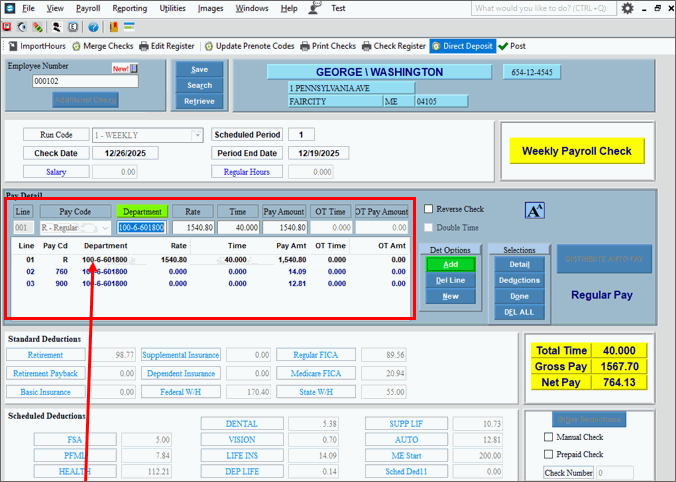
Payroll Check EntryYou can use Payroll Check Entry to edit checks that were transferred from Permanent Pay Transfer, add additional checks for those employees, or add checks for employees who are not set up in permanent pay. 1. Open Payroll Processing and you can begin entering checks. 2. At the Employee Number field enter the employee number or click Search to look for the employee. When an employee is selected, the following information is displayed.
|
|
Entering a paycheck |
If you want to create another paycheck for an employee who already
has an existing paycheck, click Additional
Check
Use these steps to enter paycheck information for an employee. 1. From Payroll Processing you can begin entering checks for employees. 2. Enter the Employee
Number and press [ENTER]. 3. The first detail line will display the employee's default information like rate of pay, hours, pay amount if salaried, etc. 4. [TAB] through the fields and enter and edit information to compute the employee's check. If the employee is hourly, enter the hours worked in the Time field. The Pay amount is calculated. 5. Press [ENTER]
or click Add 6. Confirm the information in the Standard Deductions, Scheduled Deductions, and Totals areas. 7. Click Done
|
Pay Detail Entry Fields Notes:
|
|
Line |
The program automatically assigns a line number, which displays in the Detail List below the Entry Fields. |
The drop-down list displays the Other Pay Codes that were assigned to this employee and scheduled for this pay period. When adding a new detail line, use one of the following methods to select the Other Pay Code:
Notes:
|
|
The Department Number defaults to the value assigned to employee or the Other Pay Code, but it can be edited. (up to 20 characters) Notes:
|
|
This value defaults to the rate assigned to the employee but can be edited, if applicable. (3.4 numeric) |
|
If applicable, enter the time worked or to be paid (usually expressed in hours or days) for this detail line. (4.3 numeric) Note: Depending on the Other Pay Code this amount may apply to regular time worked or to time paid for holiday, vacation, or another Other Pay Type. Tip: To enter overtime, use the OT Time field. |
|
Pay Amount |
The program calculates the Pay Amount (the Other Pay Amount Paid or the Regular Pay Amount Paid) for the selected Other Pay Code in this detail line. You can override the amount, if necessary. (7.2 numeric) Tip: The Other Pay Method Code controls the calculation. |
Enter the Overtime Time worked (usually expressed in hours or days). (4.3 numeric) Note: To automatically calculate double time, select the Double Time box. |
|
The program calculates the Overtime Amount Paid. (7.2 numeric) Rate X OT Time = OT Pay Amount Note: To automatically calculate double time, select the Double Time box. |
|
|
To complete the detail line and to add it to the Detail list, press [ENTER] or click Add. Add applies to both new detail lines and edited lines. To finish entering the check, click
Done To enter a new line for a different
Other Pay or Department number, click New
|
Check Entry Sections |
For additional information for the entries in the following areas, click the section name listed below:
|
Editing a Check |
1. To display the employee
to be changed, enter the Employee Number and click Retrieve
a.
If you do not know the employee number, you can click Search b.
If more than one check exists for the employee, you will
briefly see the message, 3. To position the pointer to the information that you want to change, press [TAB] or click the field using the mouse. 4. Enter the data changes. 5. To complete the edit
process, click Done |
Deleting a Check |
1. To display the check
to delete, enter the Employee Number and click Retrieve
a.
If you do not know the Employee Number, you can click Search b. If the employee has more than one paycheck, click Retrieve until the correct check appears. 3. Click DEL
ALL 4. At the Delete prompt,
click Proceed, or click
Cancel to escape from
the delete routine. |
Use the Payroll Check Edit Register to print the Register Reports and several Expense and Deduction Reports during the Payroll Run. Usually, you run the Payroll Check Edit Register after completing Payroll Check Entry and before printing payroll checks. To run the edit register,from Payroll
Processing, click Check Edit
Register |
|
The Update Prenote Codes process automatically changes prenote codes to send codes for direct deposits when the prenote date is reached. The routine also sets the prenote codes update date. Prenote codes indicate that direct deposits are in the prenote testing phase. Send codes indicate the direct deposits are ready for live processing. In addition, any scheduled deduction amounts in prenote are changed to zero and you are notified of the change. Confirm the amounts on the Payroll Check Edit Register. To run the Update Prenote Codes, from
Payroll Processing, select Update
Prenote Codes |
|
Use Print Payroll Checks to print the employee paychecks. You can specify the beginning check number, the sort sequence, whether or not to print an alignment page, and other options. To print checks, from Payroll Processing, select Print Checks . For directions, click here. |
|
Use the Payroll Check Register to print the Register Reports and several Expense and Deduction Reports during the Payroll Run. Usually, you run the Payroll Check Register after printing payroll checks. To run the Check Register, from Payroll
Processing, select Check Register
|
|
Use the Direct Deposit Processing to build the direct deposit export file containing the direct deposit paychecks to be sent to the bank. First, you will build the direct deposit file and generate a list of all employees with their account numbers and the amount of pay being deposited. Pre-note employees will also be listed on the report. After reviewing and confirming the direct deposit list is accurate, create the direct deposit export file. You can also update prenote dates as well. To process direct deposits, from Payroll
Processing, select Direct Deposit
|
|
Transmit DD file to Bank |
When the Direct Deposit Export is finished, the direct deposit file will be on your workstation and is ready for you to send to the bank. The Destination file circled in red in the Direct Deposit Processing specifies the direct deposit file name and its location. Please check with your bank for their instructions on uploading the file.
|
|
|
Use Update Pre-note Dates function to set the dates on any new direct deposit employees with the transmission date as the beginning of their 10-day pre-note period. It is recommended that you run this step with every payroll even if there aren’t any new direct deposit employees in the pay period. To process direct deposits, from Payroll
Processing, select Direct Deposit
|
|
Run Payroll Post |
Running the Payroll Post is the final step in the cycle of payroll processing. The Post will update the appropriate files with the current payroll information, the payroll check files are cleared, and payroll is reset for the beginning of the next payroll. If you use direct deposit the DD export file is cleared in preparation for the next payroll. To run the Payroll Post, from Payroll
Processing, select Post |
 .
. 
 to add the line to
the Detail List.
to add the line to
the Detail List.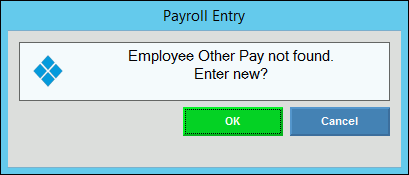

 .
The check information is saved and the fields are cleared
for the next check.
.
The check information is saved and the fields are cleared
for the next check. .
.  .
.

 .
.  .
.