Opening Statement Parameters Maintenance, click More.
1. Click Daily Work from the Menu Bar.
2. Click Billing.
3. Click Statements.
4. Click Statements
Parameters.
Or, use the keyboard
shortcut: [ALT] [y]
[b] s] [p].
Creating a new Statement Parameter, click More.
To create a new record choose one of these methods:
Enter the new Statement ID and click Retrieve
 ,
or press [ENTER].
,
or press [ENTER].
Keyboard shortcut: [ALT + t]Or, enter the new Statement ID and click File from the Menu Bar; next click New.
Keyboard shortcut: [ALT] [f] [n]
Tip: To indicate
that you are building a new Statement Parameter, New ![]() displays near the Statement
ID. Default entries display and the first field is highlighted
to let you know you can begin entering information.
displays near the Statement
ID. Default entries display and the first field is highlighted
to let you know you can begin entering information.
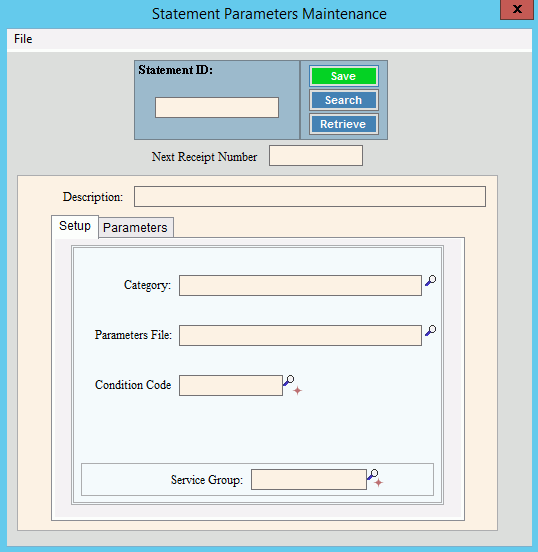
Statement Parameter Maintenance Prompts
|
|
Tip: To display
the following fields, click Setup
|
|
Enter the unique identification to be assigned to the statement parameters. (up to 10 characters) |
|
|
To update the new or changed information, click Save or press [ENTER]. Keyboard shortcut: [ALT + s] |
To avoid losing data, you must save new or changed records. |
|
|
To view all of the existing Statement Parameters, click Search. From the Search list you can select the record to change or delete. Keyboard shortcut: [ALT + r] |
|
To display an existing Statement Parameter, enter the Statement ID and click Retrieve, or press [ENTER]. Keyboard shortcut: [ALT + t] |
Enter a description for the statement parameter. (up to 40 characters) |
|
Enter the defined Category ID for the statement parameter. (up to 20 characters) Note:
To search for a Category ID, click Search
|
|
Enter the defined Parameter File for the statement parameter. (up to 40 characters) Note:
To search for a Parameter File, click Search
|
|
To qualify customers to include in the statement run if applicable, enter a Condition Code. (up to 10 characters) Tips:
|
|
To process customer statements for a group of services, enter the Service Group ID. (up to 5 characters) Tips:
|
|
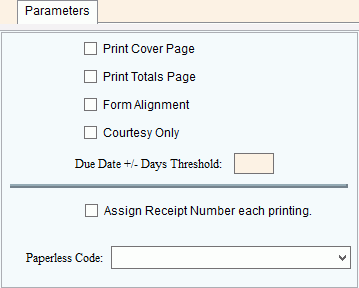
Tip: To display
the following fields, click Parameters
|
|
Print Cover Page |
To print a cover page when printing statements, select this box. To omit a cover page when printing statements, de-select this box. Note: The cover page only pertains to information used by third-party printing services. |
Print Totals Page |
To print a Totals page when printing statements, select this box. To omit a Totals page when printing statements, de-select this box. Note: The Totals Page only pertains to information used by third-party printing services. |
Form Alignment |
To print the alignment test pattern before printing statements, select this box. To omit the alignment test pattern before printing statements, de-select this box. Note: The Form Alignment option only applies to pin feed type printers. It does not pertain to laser type printers. |
To print Courtesy statements, select this box. To omit printing courtesy statements, leave this box blank. Note: If Courtesy Only is selected, the statement run will only include courtesy statements for those customers who have Courtesy Statement option set to Yes or for customers with an active additional address set for billing statements. For more information, see Print Courtesy Statements. |
|
Due Date +/- Days Threshold |
Enter the number of days the statement Due Date can be more than or less than the system date to be valid. Tip: Set this option to prevent users from inadvertently using the statement Due Date from the previous billing cycle. |
Note: This field is reserved for future use. |
|
Next Receipt Number |
Note: This field is reserved for future use. |
To include paperless statement customers as well as paper statement customers in the statement run, click Include Paperless Statement Customers. To omit paperless statement customers from the statement run, click Exclude Paperless Statement Customers. |
|
Editing an existing Statement Parameter, click More.
![]() CAUTION: To
avoid losing data, you must save new or changed records.
CAUTION: To
avoid losing data, you must save new or changed records.
1. To display the record
to be changed, enter the Statement
ID and click Retrieve
![]() , or press
[ENTER].
, or press
[ENTER].
Keyboard shortcut: [ALT
+ t]
Tip: If you do not know the Statement ID, you can
click Search ![]() to see a list of Statement
Parameters.
to see a list of Statement
Parameters.
2. To position the pointer to the information that you want to change, press [TAB] or click the field using the mouse.
3. Enter the data changes.
4. To complete the edit
process, click Save ![]() , or
press [ENTER].
, or
press [ENTER].
Keyboard shortcut: [ALT
+ s]
Deleting an existing Statement Parameter, click More.
1. To display the record
to be deleted, enter the Statement
ID and click Retrieve
![]() , or press
[ENTER].
, or press
[ENTER].
Keyboard shortcut: [ALT
+ t]
Tip: If you do not know the Statement ID, you can
click Search ![]() to see a list of Statement
Parameters.
to see a list of Statement
Parameters.
2. Click File
from the Menu Bar,
and next click Delete.
Keyboard shortcut: [ALT]
[f] [d]
3. At the Delete Records
prompt, click Proceed
to delete the record, or click Cancel
to escape from the delete routine.
Example:
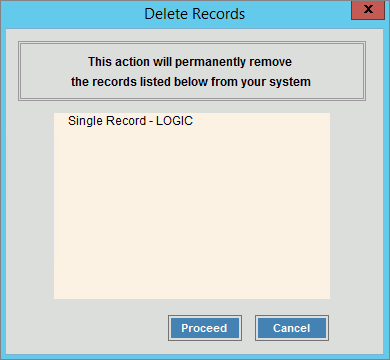
Note: After you click Proceed,
you will see the following message on the Status
Bar.
![]()