Managing appointments, click More.
How To... |
Instructions... |
Schedule an appointment |
To schedule an appointment, use one of the following methods to open the Scheduling - Appointment Scheduler Window:
|
Schedule an appointment for a new patient |
To schedule an appointment for a patient who has not yet been added during Patient Entry and does not yet have an Account Number:
|
Schedule a meeting for a provider |
For information about scheduling
meetings, see the Scheduling
Meetings Procedure. |
Double-book or triple-book a time slot |
|
Cancel an appointment |
To cancel an appointment:
|
Reschedule an appointment |
To reschedule an appointment:
|
Change the Appointment Status (Check In a Patient) |
To change the Appointment Status from Scheduled to Check In, Take Back, Lab, or Check Out, use one of the following:
|
Schedule recurring appointments |
See the Scheduling - Recurring Appointment Scheduler Window. |
Check in a patient arriving for an appointment |
Follow the instructions in one of the following topics... |
Navigating within the Appointment Book, click More.
How To... |
Instructions... |
Display the shortcut menu |
To display the Scheduling
Shortcut Menu, position the pointer anywhere in the
Appointment Book Area and right-click. |
Jump to first time slot |
To jump to the first time slot in the specified column, where # is the number of the column, press [CTRL + #]. Note:
You must use the numeric keypad for the number,
not the top row of your keyboard. |
Jump to the next available time slot |
Click Next
Available |
Display columns for later days |
|
Display columns for earlier days |
|
Managing the Providers in the Appointment Book, click More.
How To... |
Instructions... |
Add or change the providers displayed |
In the Scheduling
Parameters Panel, enter the Prov ID
and click View Keyboard
shortcut: [ALT
+ v] |
Add or change the locations displayed |
In the Scheduling Parameters
Panel, enter the Loc ID and click View Keyboard shortcut: [ALT + v] |
Change the type or location of many time slots at once |
|
Change the provider's status or add a note |
Note: The provider's status
line appears only if the User Scheduling Preference is
set accordingly. |
Changing the Appearance of the Appointment Book, click More.
How To... |
Instructions... |
Remove the Side Panel to make more room for the Appointment Book |
Click Shrink
Menu |
Toggle the position of the Side Panel between the left side and the right side |
Click the following sequence: Windows
from the Menu
Bar; Flip
Control Menu. |
Toggle
the position of the Detail
Panel between the bottom and top of the window |
Keyboard shortcut: [CTRL + u] |
Toggle
the position of the Scheduling
Toolbar between the top and bottom of the window |
Keyboard shortcut: [CTRL + y] |
Change the number of columns |
To change the number of columns displayed:
Tip:
The amount of detail that is visible for each time
slot is dependent on the number of columns displaying
in the schedule. |
Identify the forced (double-booked) appointments |
Set up User
Scheduling Preferences to display the Forced Appointment Icon |
Identify overriding appointments (different appointment types) |
Set up User Scheduling Preferences
to display the Override
Appointment Icon |
Identify rescheduled appointments |
Set up User Scheduling Preferences
to display the Rescheduled
Appointment Icon |
Display the Appointment Status Icons |
To toggle the display of the Appointment Status icons, follow the directions below. Appointment Statuses & Icons:
Directions:
|
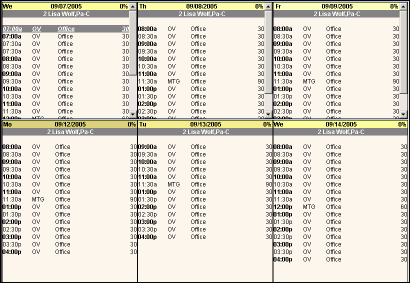
Split the columns to display two panels per column |
To increase the number of
panels you can see in the Appointment Book, right-click
anywhere in the Appointment Book Area, and then click
Split View. |
Example Split View:
|
|
Change the dates displayed |
In the Scheduling Parameters
Panel, enter the Start Date and click View
|
Highlight the time slots displayed |
In the Scheduling Parameters
Panel, enter the Start and End Times and click View
|
Change the types of appointments displayed |
In the Scheduling Parameters
Panel, enter the Appt Type and click View |
Change the length of the time slots |
|
Extend the day's length |
|
Increase the font size displayed in a specific column |
Tip:
A User Scheduling Preferences setting determines
the default font size. |
Decrease the font size displayed in a specific column |
Tip:
A User Scheduling Preferences setting determines
the default font size. |
Refresh the columns |
|
Display the Patient Account Number |
During installation, the
Appointment Book can be set up so that the Patient Account
Number displays for reserved appointments. See INSight
Scheduling GUI Parameter Maintenance. |
Change the Colors |
|
