Quick Bar: Overviews (More)---Patient---SSN_Validation---Choose_Appointment---Demographics---Contacts---Info---Comments---Diagnosis---Workers'_Comp---Workers' Comp_User-Defns---Remarks---Referral/Phys---Guarantor---Employer---Insurances---Remove_Images---Add_Images---Print_Forms
Patient Wizards - Guarantor Area
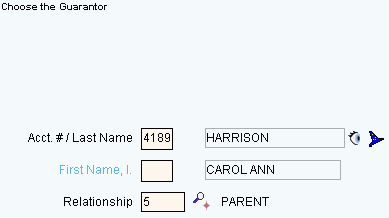
Use the Guarantor Area to maintain information about who is financially responsible for the patient's account. The guarantor is the person responsible for the patient's account, is usually the holder of the insurance policy, and receives the private statements. For example, a parent is often the guarantor for a minor child. In INSight a guarantor must have a patient record, even if not actually a patient of the practice. The table following the window example describes the Guarantor Area for the Patient Wizards.
Tips:
For general information about the Wizard menu, window layout, and navigation, see the Wizard - Introduction.
For more information about working with data in fields, see Data Entry Guidelines.
Directions:
To display the Data Entry Area for the Guarantor step:
Follow the opening instructions for the appropriate Patient Wizard.
Navigate to the Guarantor step.
Patient Wizards - Guarantor Area Example

|
Patient Wizards - Guarantor Area Prompts Tip: To see more information about a field, click the hyperlink for that field name. |
|
|
Displays the patient's last name as the default guarantor of the account. (up to 20 characters) Entry options:
|
|
|
|
To view all of the existing patient records, click Search. From the Search list you can select the record to load into the Guarantor Area. Keyboard shortcut: [ALT + r] |
|
|
To open the Patient Guarantor Wizard, click the Wizard Tips:
|
|
Displays the default patient First Name or the First Name of the guarantor's account. Press [TAB] to accept or enter a First Name. (up to 18 characters) Notes:
|
|
|
Defaults to 01 for (SELF). Press [TAB] to accept or enter another predefined Relationship ID. (up to 4 characters, defined during Relationship Maintenance) |
|
|
|
To display the previous step, click Back. Keyboard shortcut: [ALT + b] |
|
|
To display the next step, click Next or press [ENTER]. Keyboard shortcut: [ALT + n] |
|
|
To validate and save the data for all of the Wizard steps, click Finish. Keyboard shortcut: [ALT + s] |
|
|
To close the Wizard without validating or saving the data, click Close. |