Quick Bar: Overview---Demographics (More)---Insurance---Credit_Messages---Balance_Detail---Workers'_Compensation---Patient_Specifics---Referral_Authorization---Recall_Logging---Appointments_List
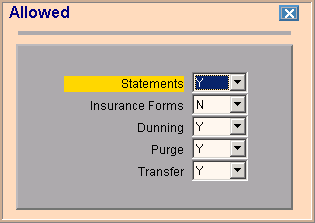
Patient Entry - Allowed Window
Use the Patient Entry - Allowed Window to individually set certain options for the patient. The table following the window example describes the Allowed fields for Patient Entry at the Demographics Window.
Note: The system automatically creates the Allowed fields for each patient and assigns default values of Yes. You only need to change the fields that you want to set to No for the patient.
Directions:
To display the Allowed Window:
Open the Demographics Window.
Tip: For details about opening windows, refer to the Patient Reference Panel.
Click the Allowed icon .
Allowed Window Example:

|
Patient Entry- Allowed Prompts Tip: To see more information about a field, click the hyperlink for that field name. |
|
|
To print statements if the patient balance qualifies, click Y in the drop-down list. To prevent the printing of private statements, click N in the drop-down list. |
|
|
To allow an insurance claim to be printed for this patient, click Y in the drop-down list. To prevent an insurance claim from printing for this patient, click N in the drop-down list. |
|
|
To print dunning messages on the patient's statements and to display the messages in their accounts, click Y in the drop-down list. To prevent dunning messages from printing on the patient's statements and from displaying in their accounts, click N in the drop-down list. |
|
|
To allow the patient account to be purged (deleted) if the balance is zero and the account has no activity, click Y in the drop-down list. To prevent the patient account from being purged even if it qualifies, click N in the drop-down list. |
|
|
To enable the automatic transfer of patient services using the Transfer of Responsibility function, click Y in the drop-down list. To prevent the automatic transfer of the patient's charges, click N in the drop-down list. |
|
|
|
To complete your entries, close this window and return to the Patient Entry - Demographics Window, click |