Quick Bar: Overview---Demographics (More)---Insurance---Credit_Messages---Balance_Detail---Workers'_Compensation---Patient_Specifics---Referral_Authorization---Recall_Logging---Appointments_List
Patient Entry - Guarantor Area
Use the Patient Entry - Guarantor Area to maintain information about who is financially responsible for the patient's account. The guarantor is the person responsible for the patient's account, and may or may not be the patient. Generally, the guarantor is the holder of the insurance policy and receives the private statements. The table following the window example describes the Guarantor Area for the Patient Entry - Demographics Window.
Note: The guarantor must first be set up as a patient, even if they are not a patient and are only paying the bills.
Directions:
To display the Guarantor Area, open the Demographics Window.
Tip: For details about opening windows, refer to the Patient Reference Panel.
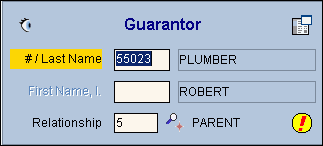
Guarantor Area Window Example:
|
Patient Entry - Guarantor Prompts Tip: To see more information about a field, click the hyperlink for that field . |
|
|
|
To view all of the existing patient records, click Search. From the Search list you can select the record to load into the Guarantor Area. Keyboard shortcut: [ALT + r] |
|
|
To open the Guarantor Information Window, click the Guarantor Drill Down Icon. Tip: Use the Guarantor Window to verify and edit guarantor demographic and insurance information. Note: The Guarantor Drill Down Icon only appears if you enter an Account Number for a guarantor different from the current patient account number. |
|
Displays the patient's last name as the default guarantor of the account. (up to 20 characters) Entry options:
Note: If you enter an Account Number in the #/Last Name field, the Import Insurances Icon |
|
|
Displays the default patient First Name or the First Name of the guarantor's account. Press [TAB] to accept or enter a First Name. (up to 18 characters) Notes:
|
|
|
Defaults to 01 for (SELF). Press [TAB] to accept or enter another predefined Relationship ID. (up to 4 characters, defined during Relationship Maintenance) |
|
|
|
To open the Import Guarantor Insurance Window, click the Import Insurances Icon. To see directions for importing insurance information, click Here. Tip: Use the Import Guarantor Insurance Window to quickly and selectively import guarantor insurance information to the patient's account. Note: The Import Insurances Icon only appears if you enter an Account Number other than the current patient account number as the guarantor. |
![]()